FasterFood Application
Instructions for Local Deployment and
Synchronization with Internet-Hosted SVN Repository
- Current Policies for Angular Modules
- We avoid as much as possible to include development version control for files or directories that are generated as result of the application's package management process such as the node_modules folder. For the most part, version control is restricted to the application's own assets, not dependecy assets. This policy might bring its own set of problems, but dependency management issues are to be resolved in a case by case basis.
- Developers that are new to the project MUST install the projects's official Angular version. As a result, when the Angular ng new <project> command is used, the resulting package.json file should be almost identical to the other developer's. Dependency reconciliation among developers should be performed among all developers whenever a new developer generates his/her own working copy to deploy locally.
- Creating a Working Copy of the SVN Repository
- Make sure that you get fully familiarized with the TortoiseSVN section "Checking Out A Working Copy".
- Select a development folder on your local computer that you will use to work on this project. In your development folder, create a folder that will contain your working copy of the project. For example, you may give it the name "FasterFood".
-
Now, make sure that you can browse the SVN repository at the server.
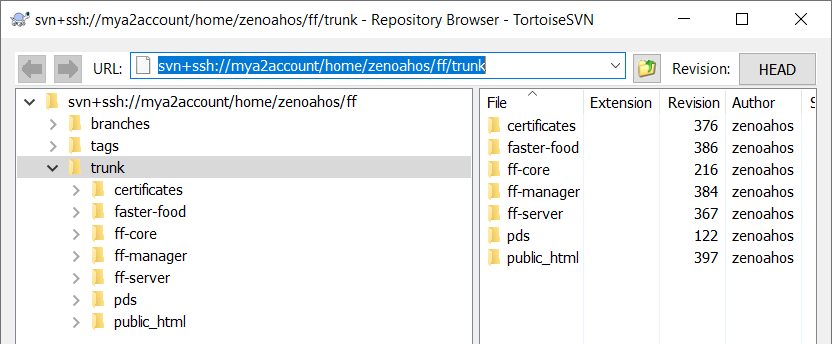
-
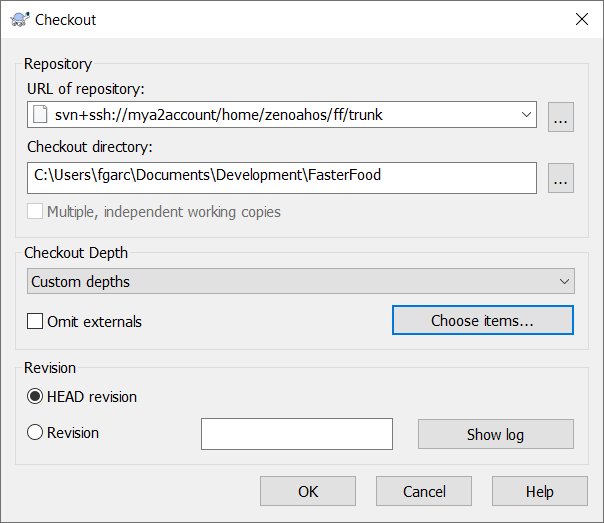
Right-click on your local project folder and select "SVN Checkout".
Make sure that the URL of the SVN repository is as shown in the image below.
URL of Repository: svn+ssh://mya2account/home/zenoahos/ff/trunk
Of course, this image assumes that the session name that you saved in PuTTY is "mya2account". If not, your specific session name should show up at the URL field. -
In the Checkout window,
select "Choose Items...". This option will automatically set the Checkout Depth to "Custom Depths".
Also, verify that the "Checkout directory" is the local folder that you created for this project in
your development directory. Then click OK.
-
Select only the directories that are under the scope of your work. If you are going to work on at least one of the
front end modules (i.e., faster-food or ff-manager), you must include the "ff-core" folder. Then click OK.
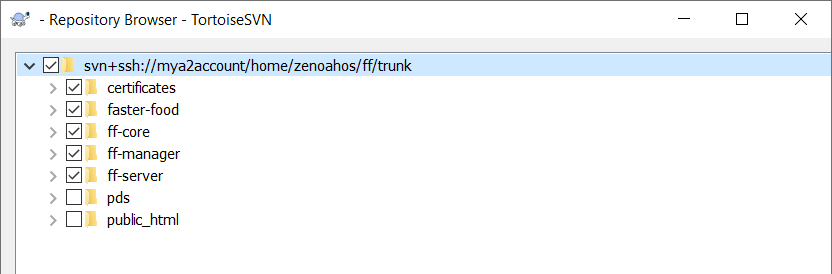
You might notice that, by choosing your checkout items, the Checkout Depth is automatically set to "Custom depths" when you return to the Checkout window.
- Initialization of Angular Front End Modules
As of this writing, this project contains two front-end modules coded in Angular. One of them is a module that allows customers place their orders. This module is located in a folder named "faster-food". The other is an orders management module to be used by the business owner. This module is located at a folder named "ff-manager".
To install locally, perform the following steps:
- Setup your development environment and workspace as described in the official Angular guide (Prerequisites and the Install the Angular CLI sections ONLY) .
- Select or create a temporary folder on your local machine. This folder must be completely separate and outside of your SVN folder. Work on a single module at a time.
- From a terminal/console window, go to the selected folder and create an Angular project:
-
If you are going to install the FasterFood customer-facing mobile app:
ng new faster-food --skipGit=true
-
If you are going to install the business owner order management module:
ng new ff-manager --skipGit=true
You will transfer many files from this folder to your SVN working copy folders in the next step. Then you can delete the temporary folder. -
If you are going to install the FasterFood customer-facing mobile app:
- Transfer of Front-End Angular Objects.
In this step, make sure that you DO NOT OVERWRITE files or folders that are currently under source control and that you will find in your working copy of the target module.
-
Use the table below to copy files and folders that are not under source control from the
temporary Angular project created in steps 1 - 3
of the previous section section to their corresponding location in your SVN working copy
of the target angular module. Both your temporary folder and your SVN working copy folder should
have exactly the same name.
File or Directory Name Under Source Control Must be transferred  src
src
angular.json package-lock.json
package.json
e2e
.editorconfig .gitignore browserslist karma.conf.js
node_modules
README.md tsconfig.app.json tsconfig.json tsconfig.spec.json tslint.json -
Test the front-end as follows:
-
From the command line execute the following:
The command options being used here with the ng serve command should allow you to connect from your smartphone provided that the phone and the computer serving the front-end app are connected to the same local area network.ng serve --host=0.0.0.0 --port 4201 --disable-host-check
- Navigate to the app using your computer's browser:
http://localhost:4201 - If the application launches ok, then verify your computer's ip address and perform a test,
from your smartphone by navigating to the app using:
http://<host_ip_address>:4201
Example: http://192.168.0.4:4201
-
From the command line execute the following:
- If all tests go well, you may discard the temporary folder created on steps 1 - 2 of the Front-End section.
-
Use the table below to copy files and folders that are not under source control from the
temporary Angular project created in steps 1 - 3
of the previous section section to their corresponding location in your SVN working copy
of the target angular module. Both your temporary folder and your SVN working copy folder should
have exactly the same name.
- Building and Testing the Back-End
The application's back-end is being coded using the Express web framework and uses MongoDB to store data.
To build and test locally, do the following:- Make sure that you have MongoDB installed in your local computer.
-
From a terminal/console window, go to your SVN working copy of the ff-server folder.
cd your_development_folder_path/your_SVN_working_copy_folder>/ff-server
Windows example:
cd C:\Users\fgarc\Documents\Development\SVN\ff-server
-
Then build with npm in order to install current dependencies as defined in the package.json file.
As of this writing, the only dependencies are Express and Mongoose:
npm install
- From Visual Studio Code, open the persist.service.ts file from the faster-food>src>app folder.
-
Find the following line:
public ordersUrl: string = 'http://... - Verify the ip address of your local machine. On Windows, this is done with the ipconfig command*.
-
Replace the existing ip address in the identified line of the persist.service.ts file with your
computer's ip address.
*Note: For development purposes, if you are working in your home network, it is best to set a permanent address for your computer in the LAN/DHCP settings of your modem/router. Otherwise it will change constantly and you will find yourself changing this address in the project and the link or bookmark that you will use to launch the application from your smartphone.
- From your ff-server folder, start the back-end:
node server
Server running at http://localhost:3000/
Mongoose default connection open to mongodb://localhost:27017/Jump
-
Open a MongoDB terminal/console window.
C:\mongodb\bin>mongo
MongoDB shell version v3.6.5
connecting to: mongodb://127.0.0.1:27017
MongoDB server version: 3.6.5
Server has startup warnings:
2018-12-20T20:12:39.121-0400 I CONTROL [initandlisten]
2018-12-20T20:12:39.121-0400 I CONTROL [initandlisten] ** WARNING: Access control is not enabled for the database.
2018-12-20T20:12:39.121-0400 I CONTROL [initandlisten] ** Read and write access to data and configuration is unrestricted.
2018-12-20T20:12:39.121-0400 I CONTROL [initandlisten]
2018-12-20T20:12:39.121-0400 I CONTROL [initandlisten] ** WARNING: This server is bound to localhost.
2018-12-20T20:12:39.121-0400 I CONTROL [initandlisten] ** Remote systems will be unable to connect to this server.
2018-12-20T20:12:39.121-0400 I CONTROL [initandlisten] ** Start the server with --bind_ip <address> to specify which IP
2018-12-20T20:12:39.121-0400 I CONTROL [initandlisten] ** addresses it should serve responses from, or with --bind_ip_all to
2018-12-20T20:12:39.121-0400 I CONTROL [initandlisten] ** bind to all interfaces. If this behavior is desired, start the
2018-12-20T20:12:39.121-0400 I CONTROL [initandlisten] ** server with --bind_ip 127.0.0.1 to disable this warning.
2018-12-20T20:12:39.121-0400 I CONTROL [initandlisten]
2018-12-20T20:12:39.121-0400 I CONTROL [initandlisten]
2018-12-20T20:12:39.121-0400 I CONTROL [initandlisten] ** WARNING: The file system cache of this machine is configured to be greater than 40% of the total memory. This can lead to increased memory pressure and poor performance.
2018-12-20T20:12:39.121-0400 I CONTROL [initandlisten] See http://dochub.mongodb.org/core/wt-windows-system-file-cache
2018-12-20T20:12:39.121-0400 I CONTROL [initandlisten]
>
- The back-end writes order data to a database named Jump, but at this point
the database does not exist.
> show databases
admin 0.000GB
config 0.000GB
local 0.000GB
-
In another console window, make sure that the front end is running following the instructions in the previous section.
ng serve --host=0.0.0.0 --port 4201 --disable-host-check
-
From a web browser in your computer, verify that you can launch the app by
navigating to http://localhost:4201.
-
Test the app from your smartphone's browser by navigating to the ip address of
your computer making sure that you specify port 4201. You identified this ip address
in step 6.
Example: http://192.168.0.4:4201 - Go to the menu and select the first two items.
- Click on the submit button ONE TIME ONLY.
-
Excercise: Verify if the "Jump" database was created and whether
or not any data was stored in a collection named "customerorders".
If you find data, you have successfully completed your local deployment :-)